UV-3R is an excellent radio that surprised me too.
I did not expect anything positive at this price, but the opposite is true.
Dimensions already implies that RX parameters aren't reaching desktop device
parameters, but at this price it's excellent radio with good mechanical precision.
The only thing I really hated was horrible loud reproduction at the lowest possible level.
On eham.net I read that it can be corrected by resistor exchange.
But I didn't found a description, so I went ahead alone and here are my result.
I would like to note that I take no responsibility for any damage that may happen in
the handling of your radio and also not responsible for loss guarantees.
By poor handling you can damage the radio!
This is to be understood before disassembling!
You must really watch this video, so you know how it is necessary to start with disassembly.
Then look at my pictures and understand how it is easy to replace resistor in UV-3R
Background ...
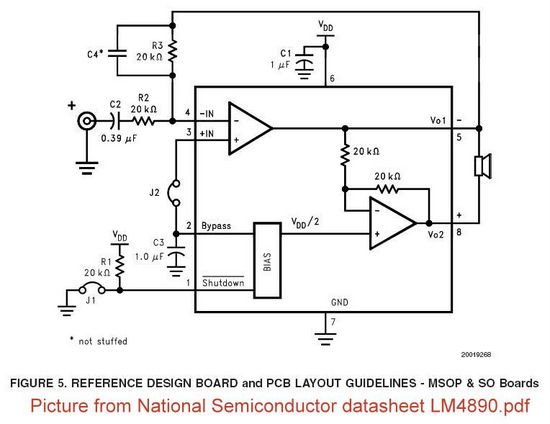
The first picture is a schematic figure of the recommended audio amplifier.
Semiconductor LM4890 was applied by the manufacturer in its construction of UV-3R.
On the recommended circuit is applied feedback 22kohm resistor R3.
Baofeng, I do not know for what reason he used 100kohm resistor.
After an exchange of this resistor 5 times lower audio amplification at the output is achieved.
From my experience it is sufficient.
If you need to have more quiet radio, I would recommend 18kohm resistor.
After the modification of the radio with 22kohm resistor it is clearly readable at
the lowest volume (home environment)
How to ...
Unscrew all the screws like it's in the video. There is no need to remove the speaker :-).
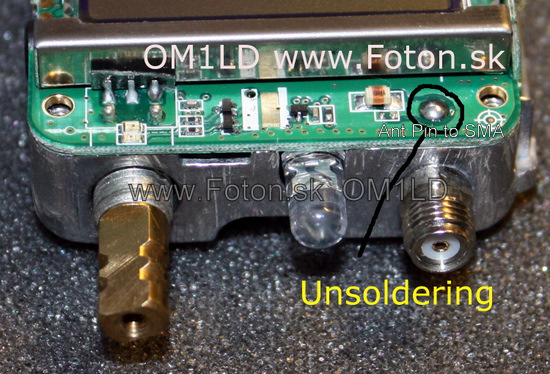
Rotary encoder is also necessary to be loosen by unscrewing the large nut from the top of TRX.
Not seen on the figure, I put it down before shooting the picture.
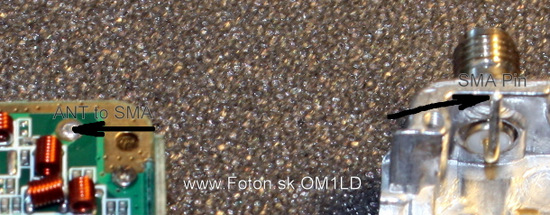
The figure shows a pad that needs to be unsoldered.
I used gentle pressure on the board during warm-up of pad, but of course you can use a vacuum unsoldering station.
After unsoldering already nothing prevents separation of the two parts.
This one soldering joint prevents the easy disassembly.
You can remove board by pulling it down and up togeter, as it allows rotary encoder.
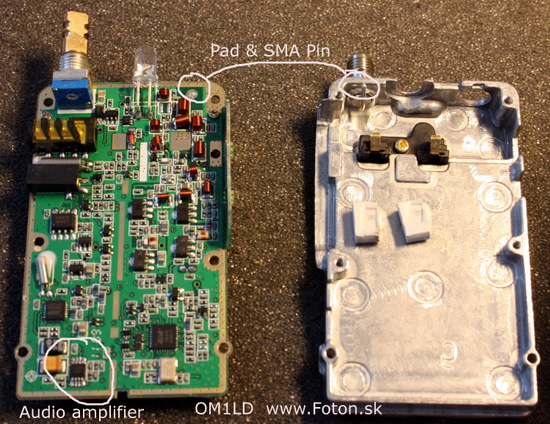
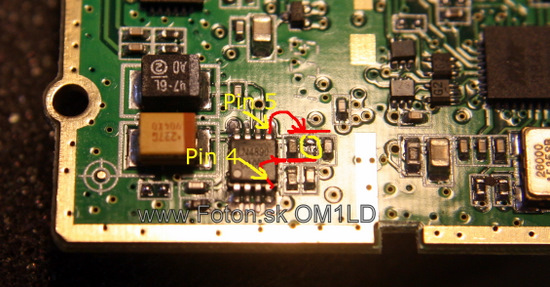
Turn over the PCB with LCD screen down side. In the bottom left of PCB is the LM4890 1W audio amplifier.
In the figure is shown a place, where is the original 100kohm resistor.
This should be replaced by the 22kohm resistor.
Manufacturer use very small parts, so I decided to try to replace the resistor by series 0603, which is accessible in shops.
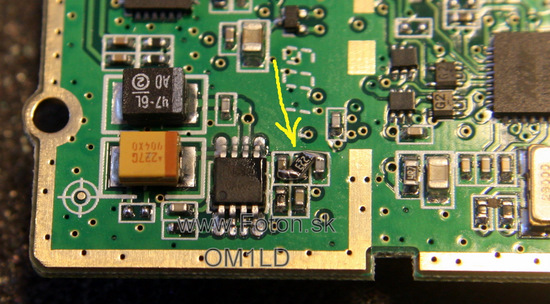
On the figure below can be seen how it can be done.
Beware, you can not solder resistor in inappropriate angle, as this may cause a short circuit.
After soldering, check the resistor value.
If You measure resistance value of resistor You have used, it's OK.
Modification is finished!
Before assembly be sure to thoroughly clean the soldering pad for SMA conector. It needs to be clean.
Good luck and have a lot of good QSO with radio Baofeng UV-3R